ViewTurbomacOS
macOS user guide
Get set up, explore the essentials, and make the most of ViewTurbo.
On this page
01 Choose Language and Region
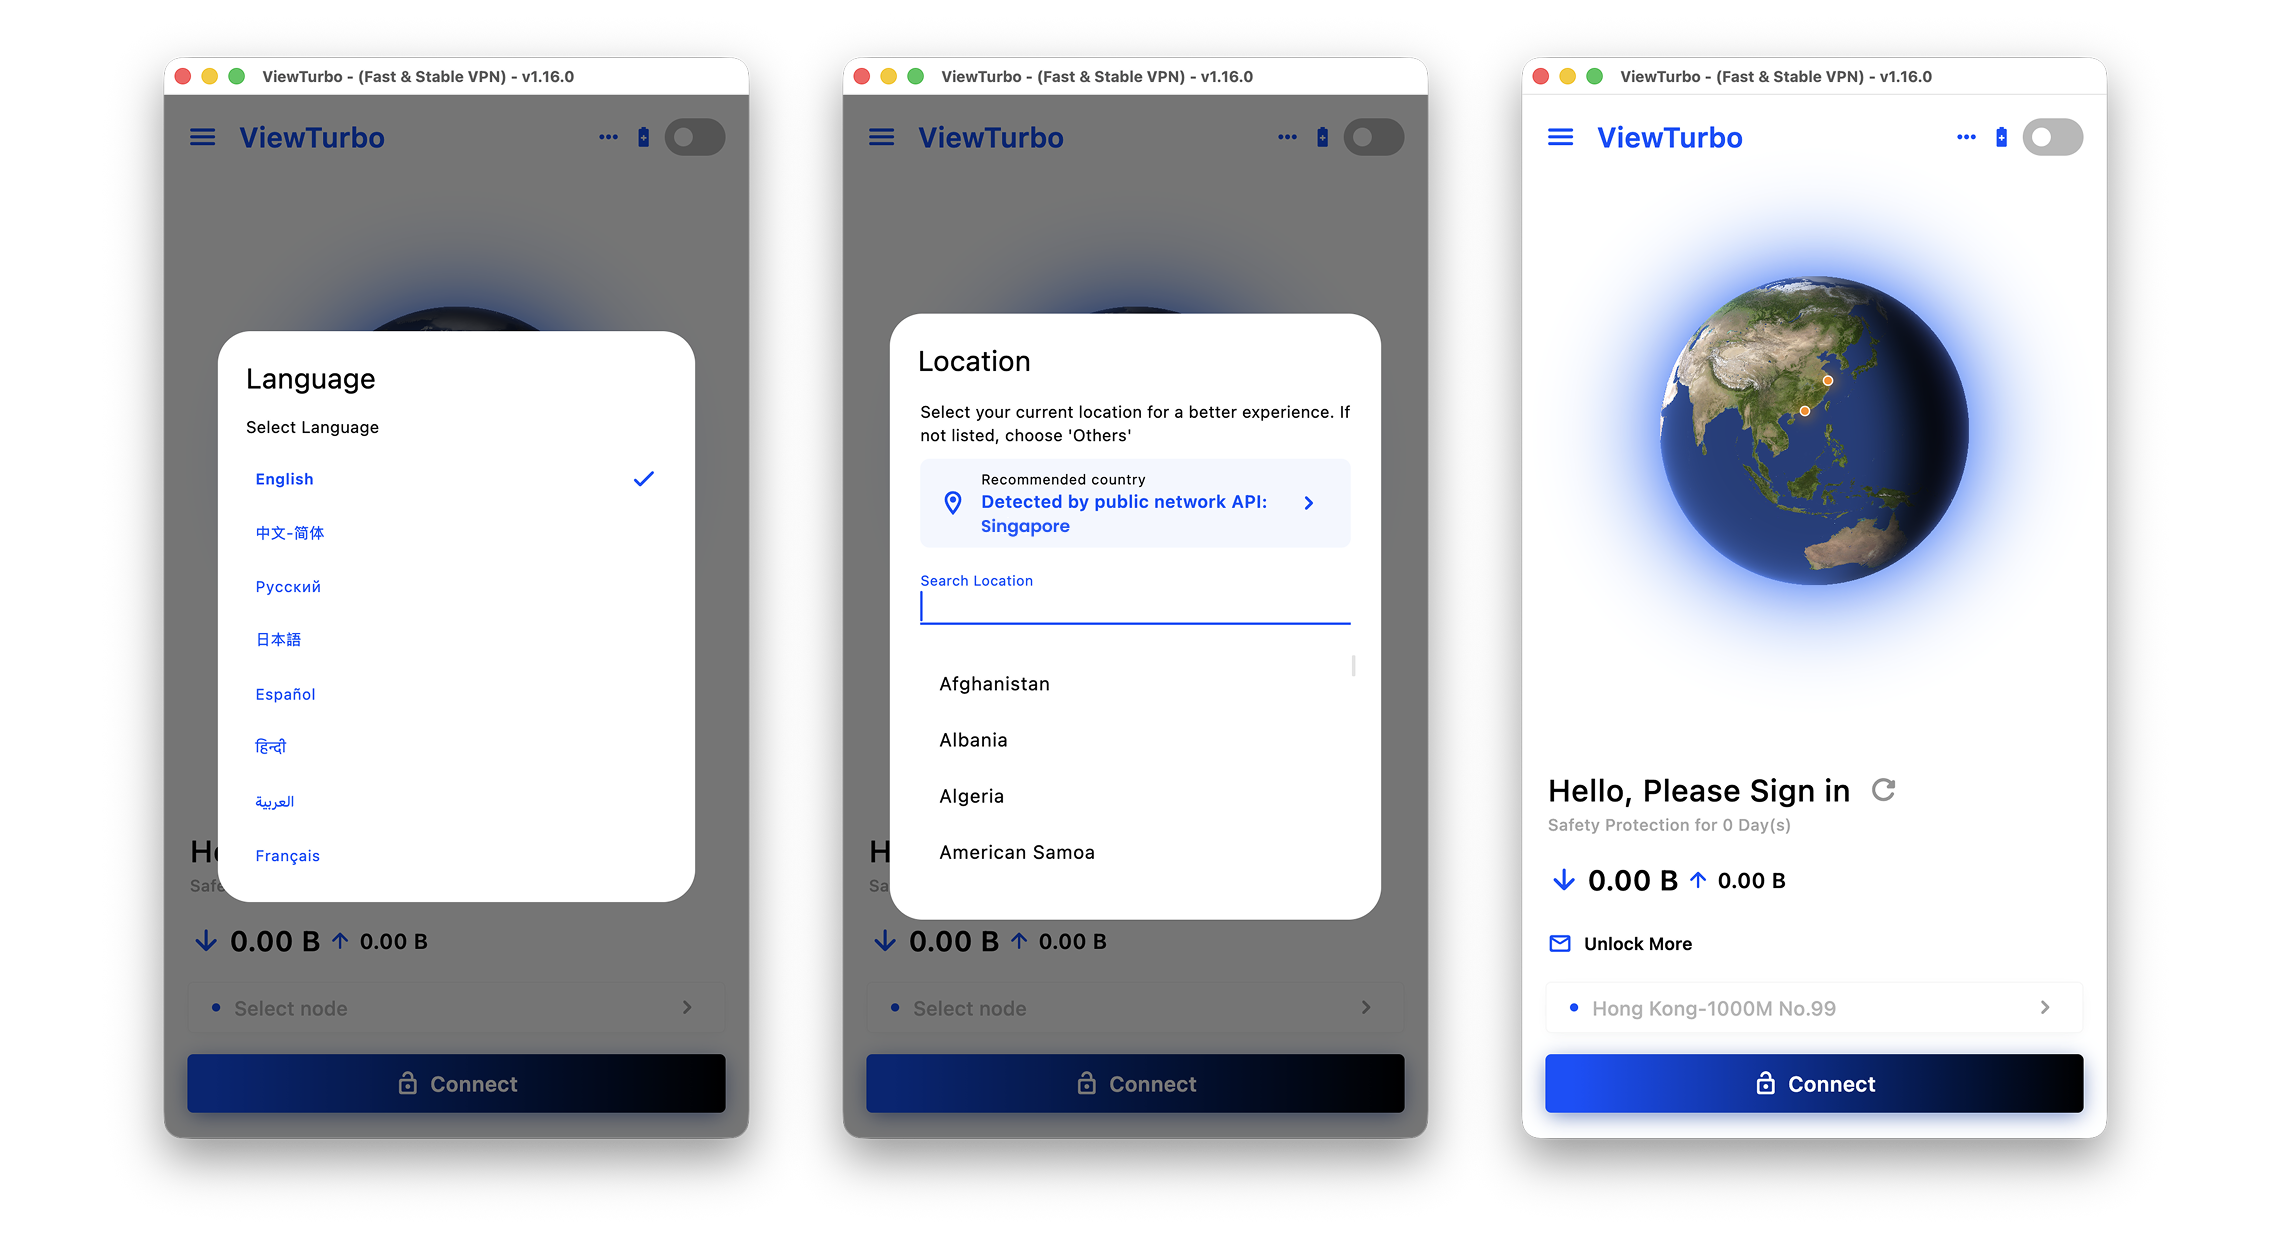
On first launch, you will be asked to choose a language. After that, you will be asked to choose your location.
If the selected region is different from your actual country or region, you may be unable to connect to our servers, or AI Proxy may become very slow.
If you move to a new country or region, that is fine. Click  in the upper-right corner of the home page to open the navigation menu. Then click
  to enter the Setting page and change the language or region.
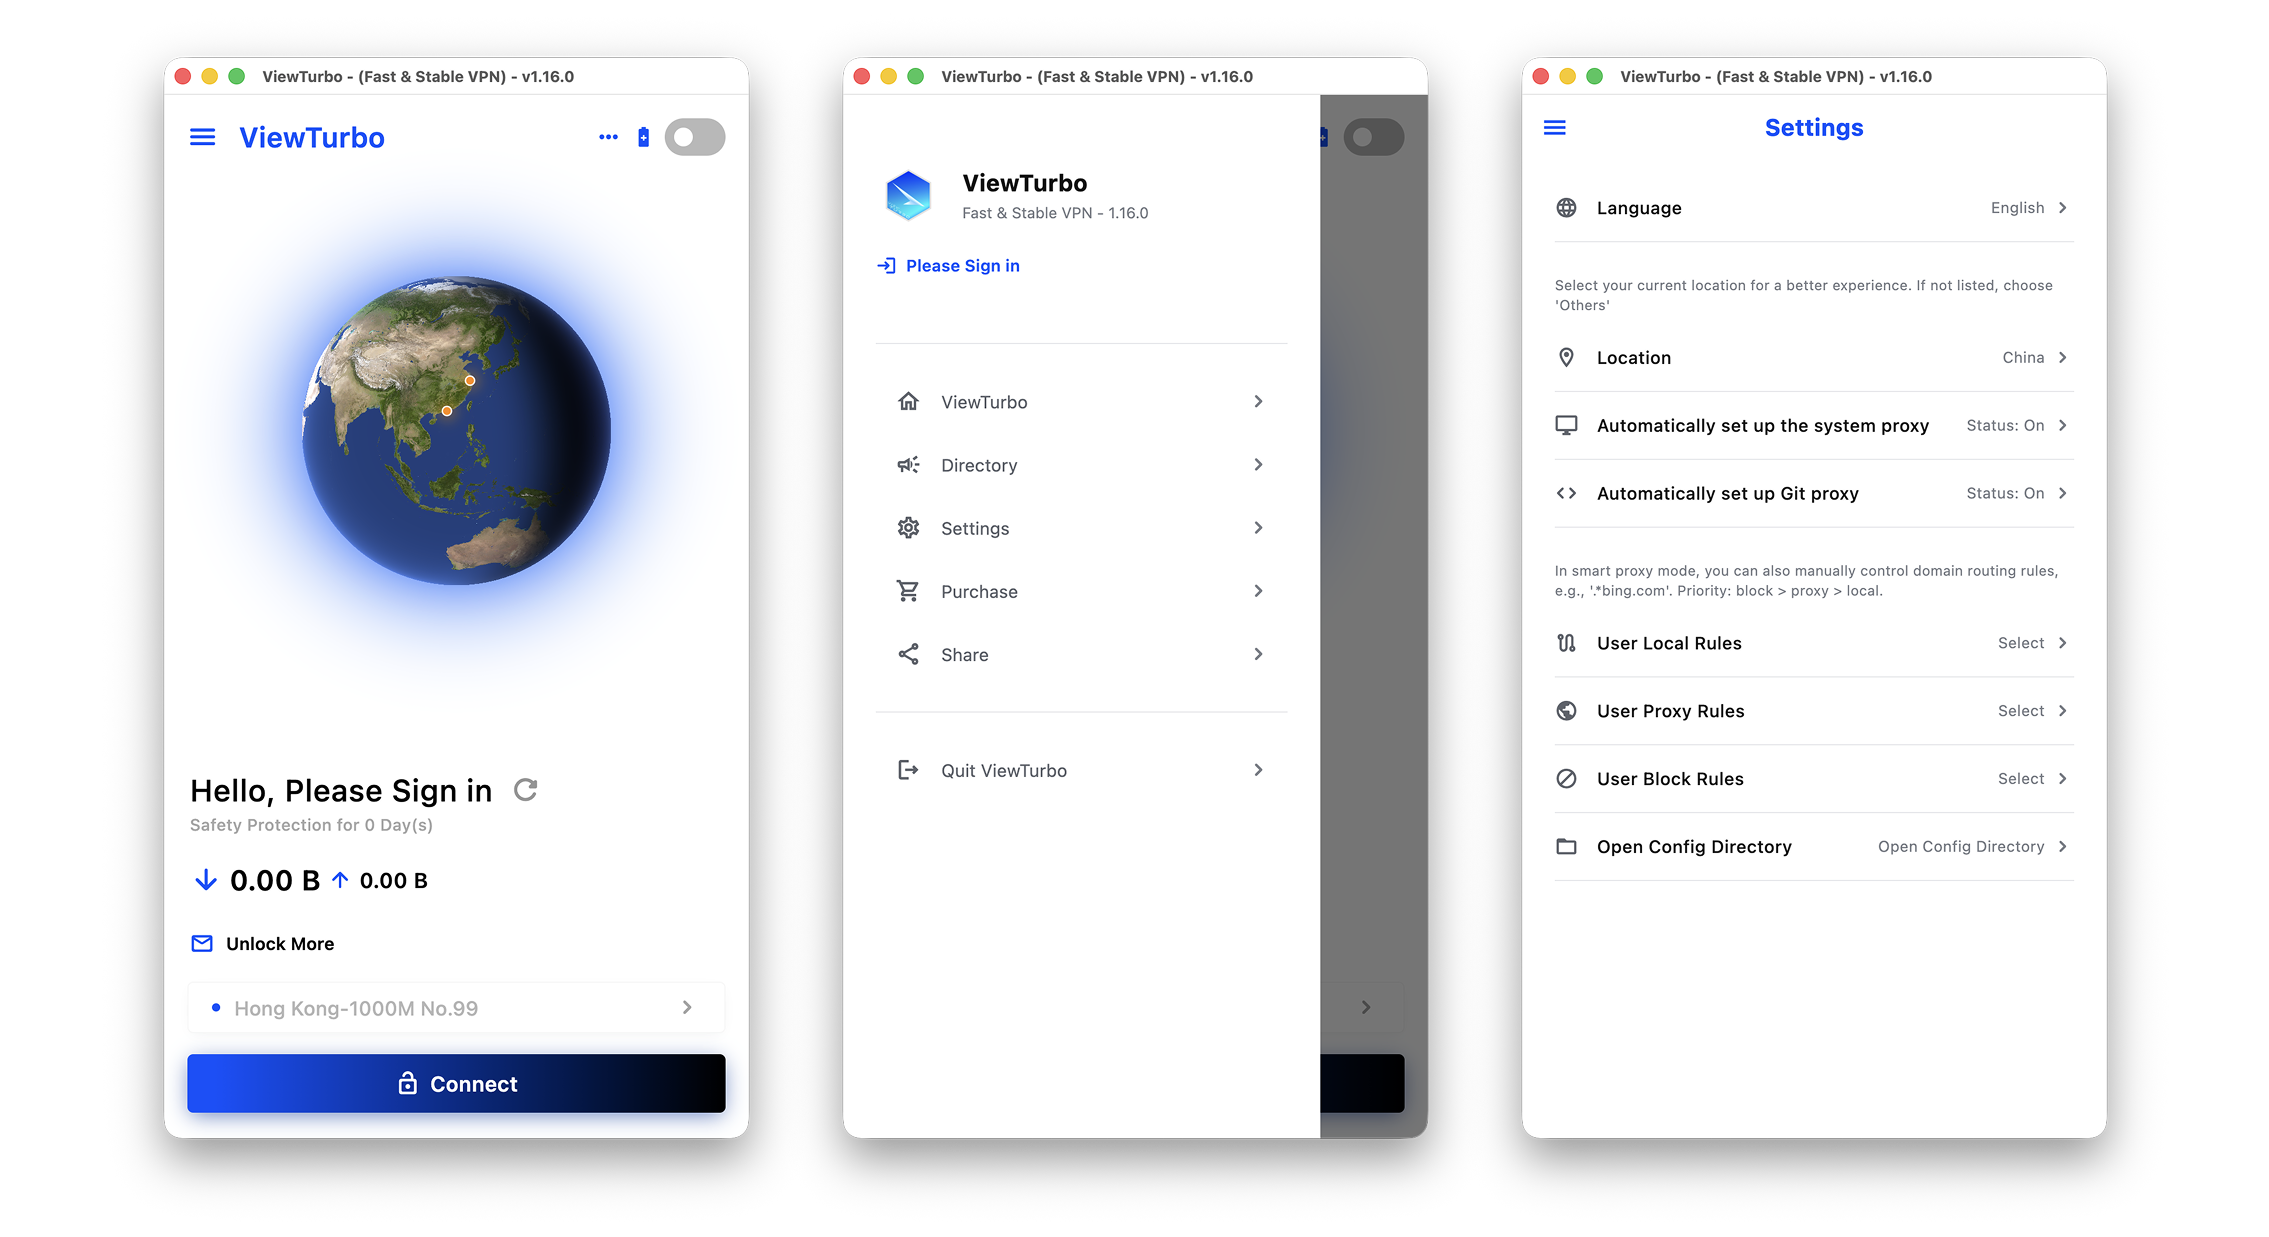
Click in the upper-left corner to show the navigation menu, then click Please Sign in to log in or register. If you are not logged in, you can also click Connect on the main screen to open the login window.
02 Log In or Register
2.1 Log In
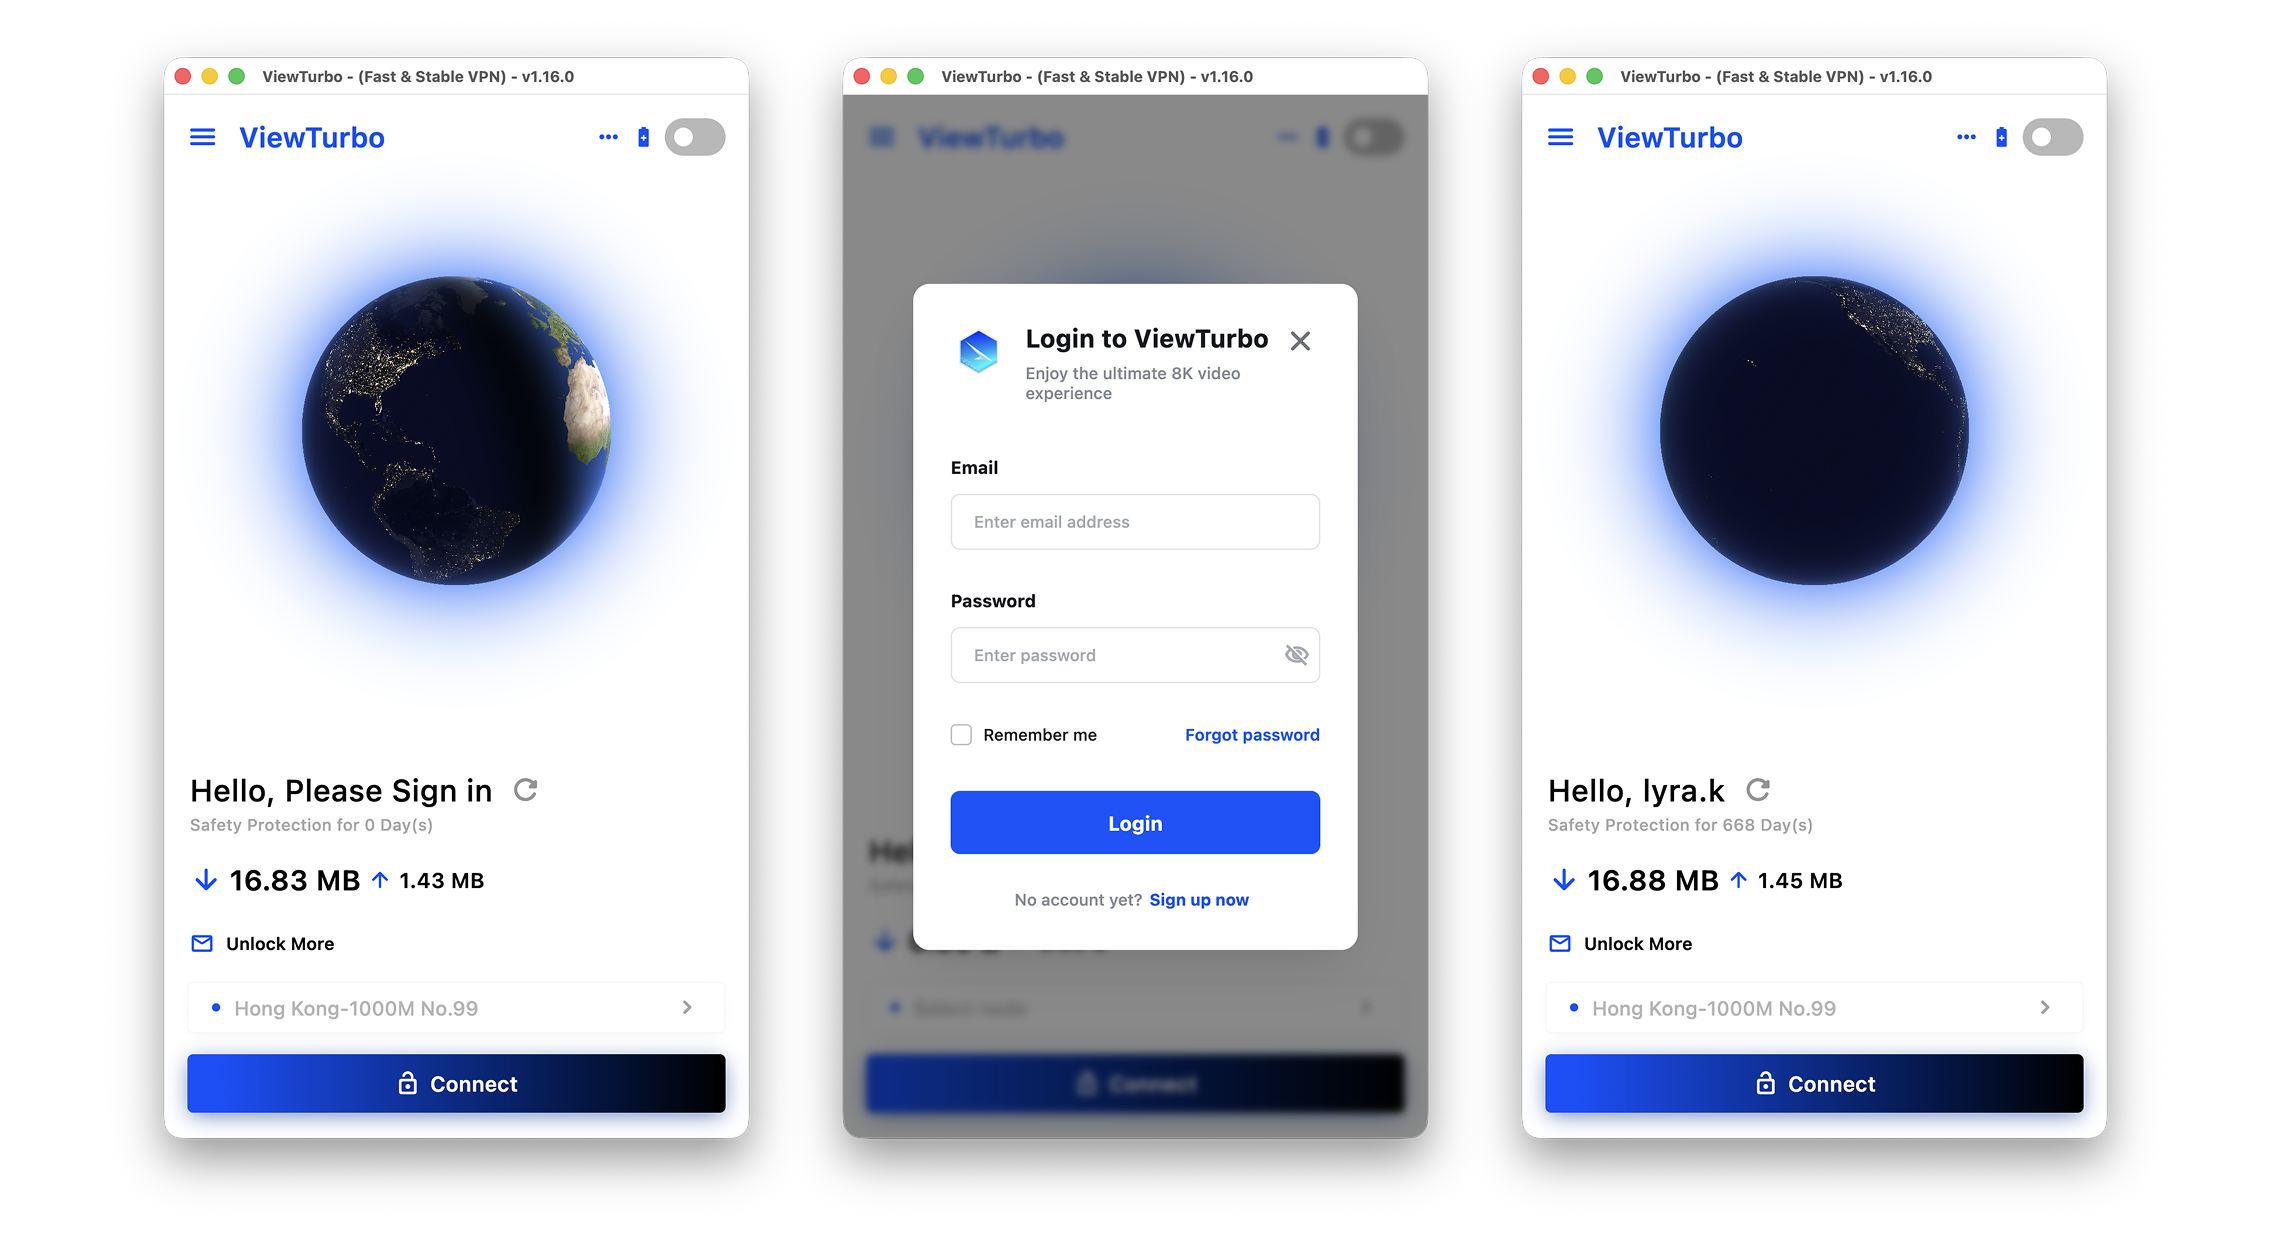
Click in the upper-left corner to show the navigation menu, then click Please Sign in to log in or register. If you are not logged in, you can also click Connect on the main screen to open the login window.
2.2 User Data
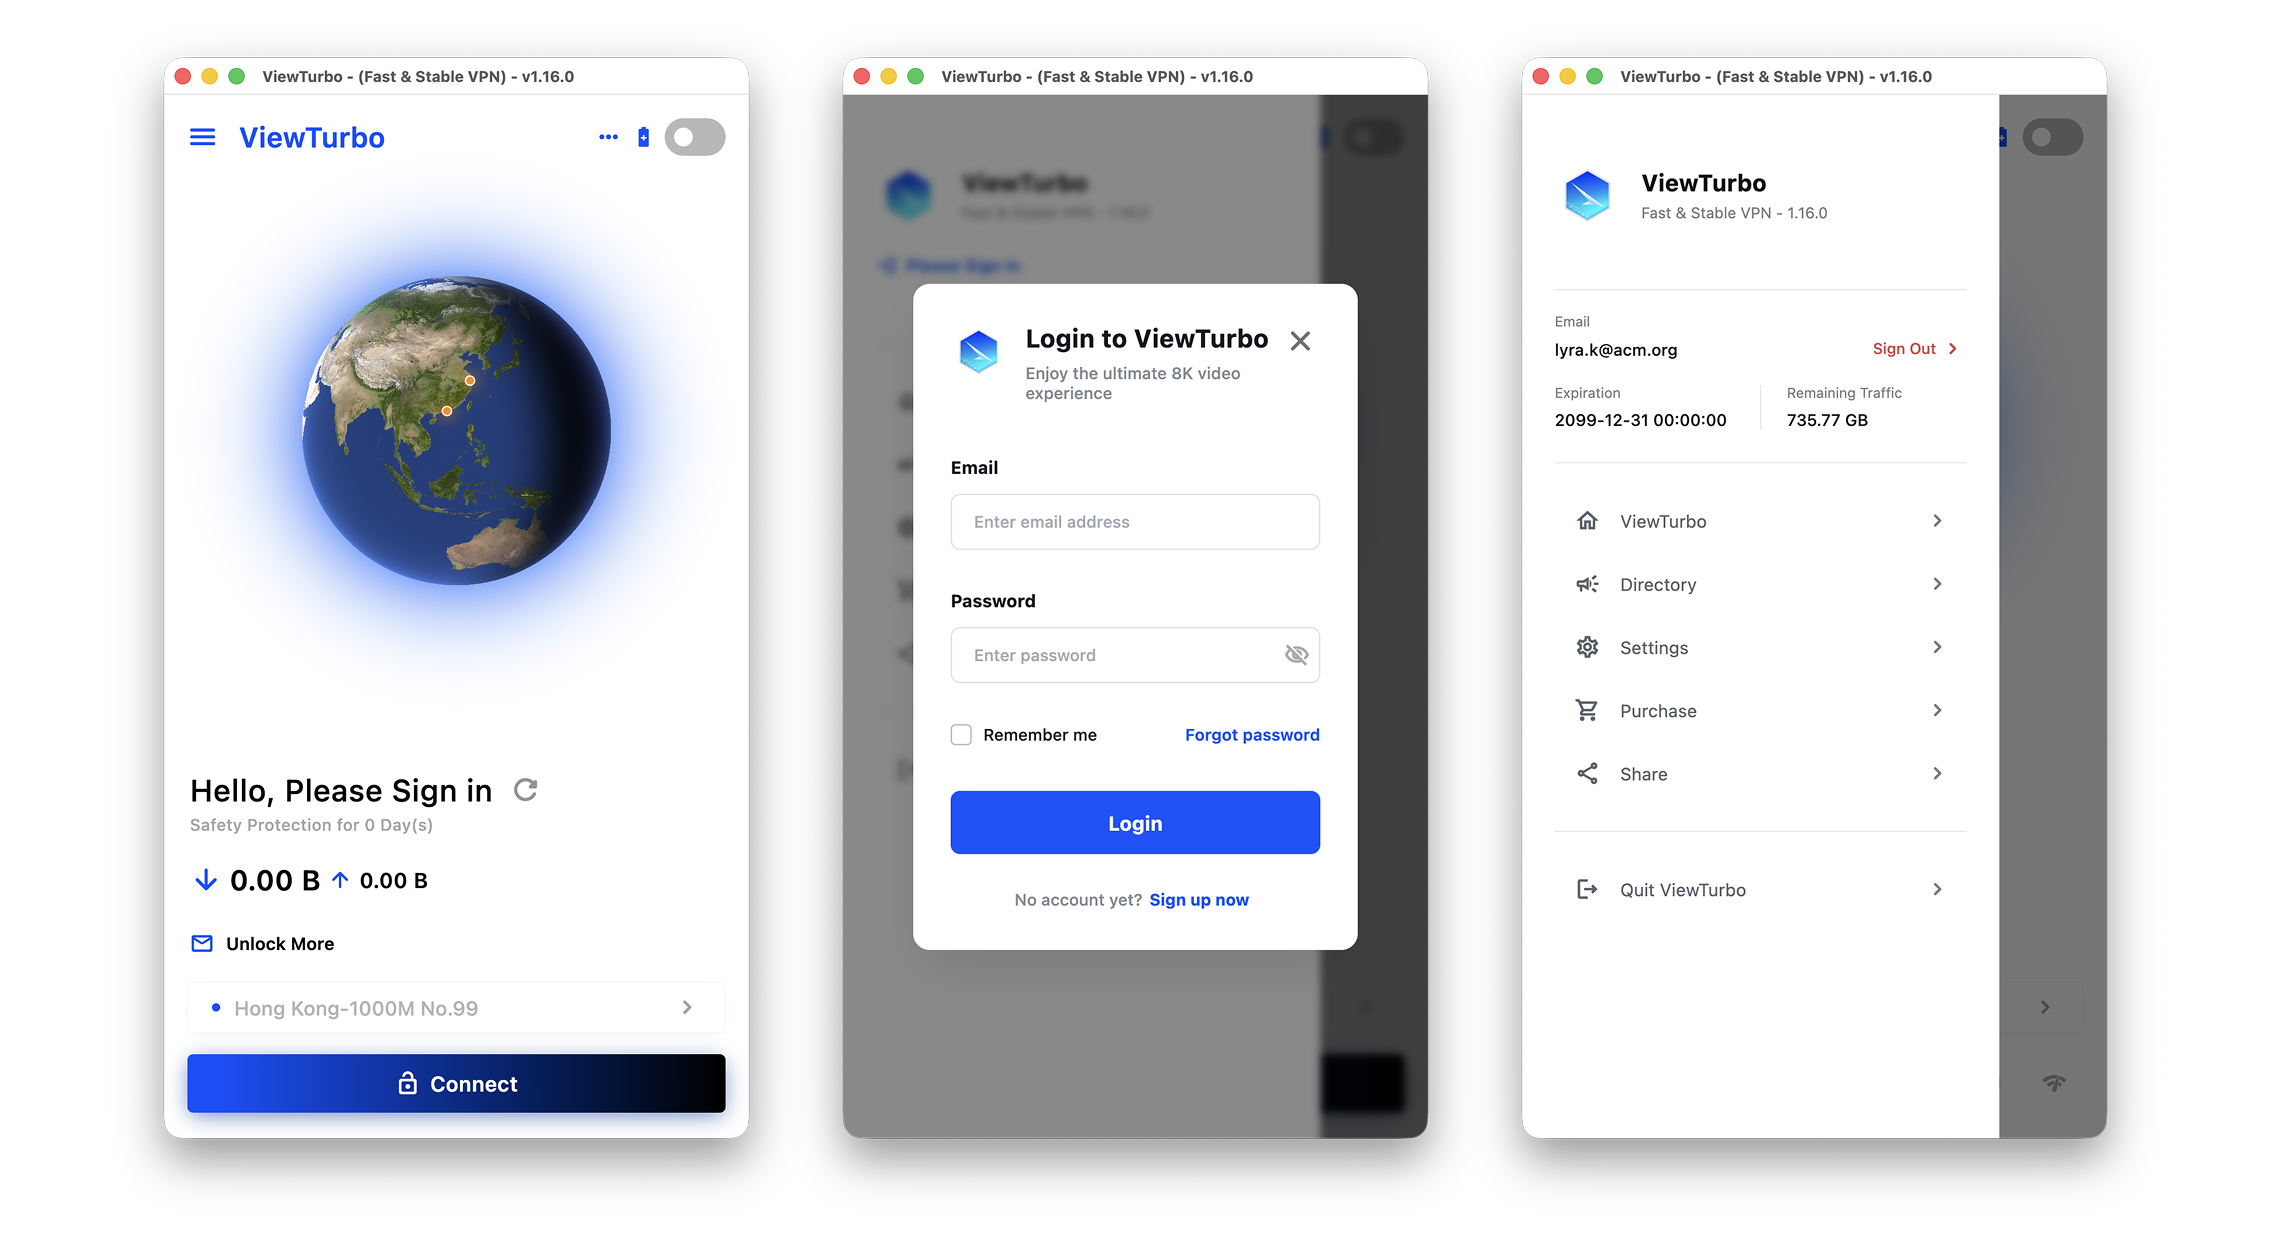
To return to the home page, click the blank gray area, or click  ViewTurbo.
After logging in, you can view your current account information in the navigation menu.
- Expiration: This indicates the account type. If it shows 2099/12/31, you are a traffic-based user. If it shows a specific expiration date, you are a duration-based user. You can view our plans on the Price page.
- Remaining Traffic: This shows your remaining traffic. If it shows 0.00B, acceleration cannot be used and you need to top up traffic. If you are a monthly member, it will show 9999GB.
- Sign Out: Sign out of the current account.
If your information has not updated after topping up, do not worry. Click the refresh  button next to your username on the main screen to get the latest information. This refreshes: User Information, Node Information, and Settings Information.
2.3 Register
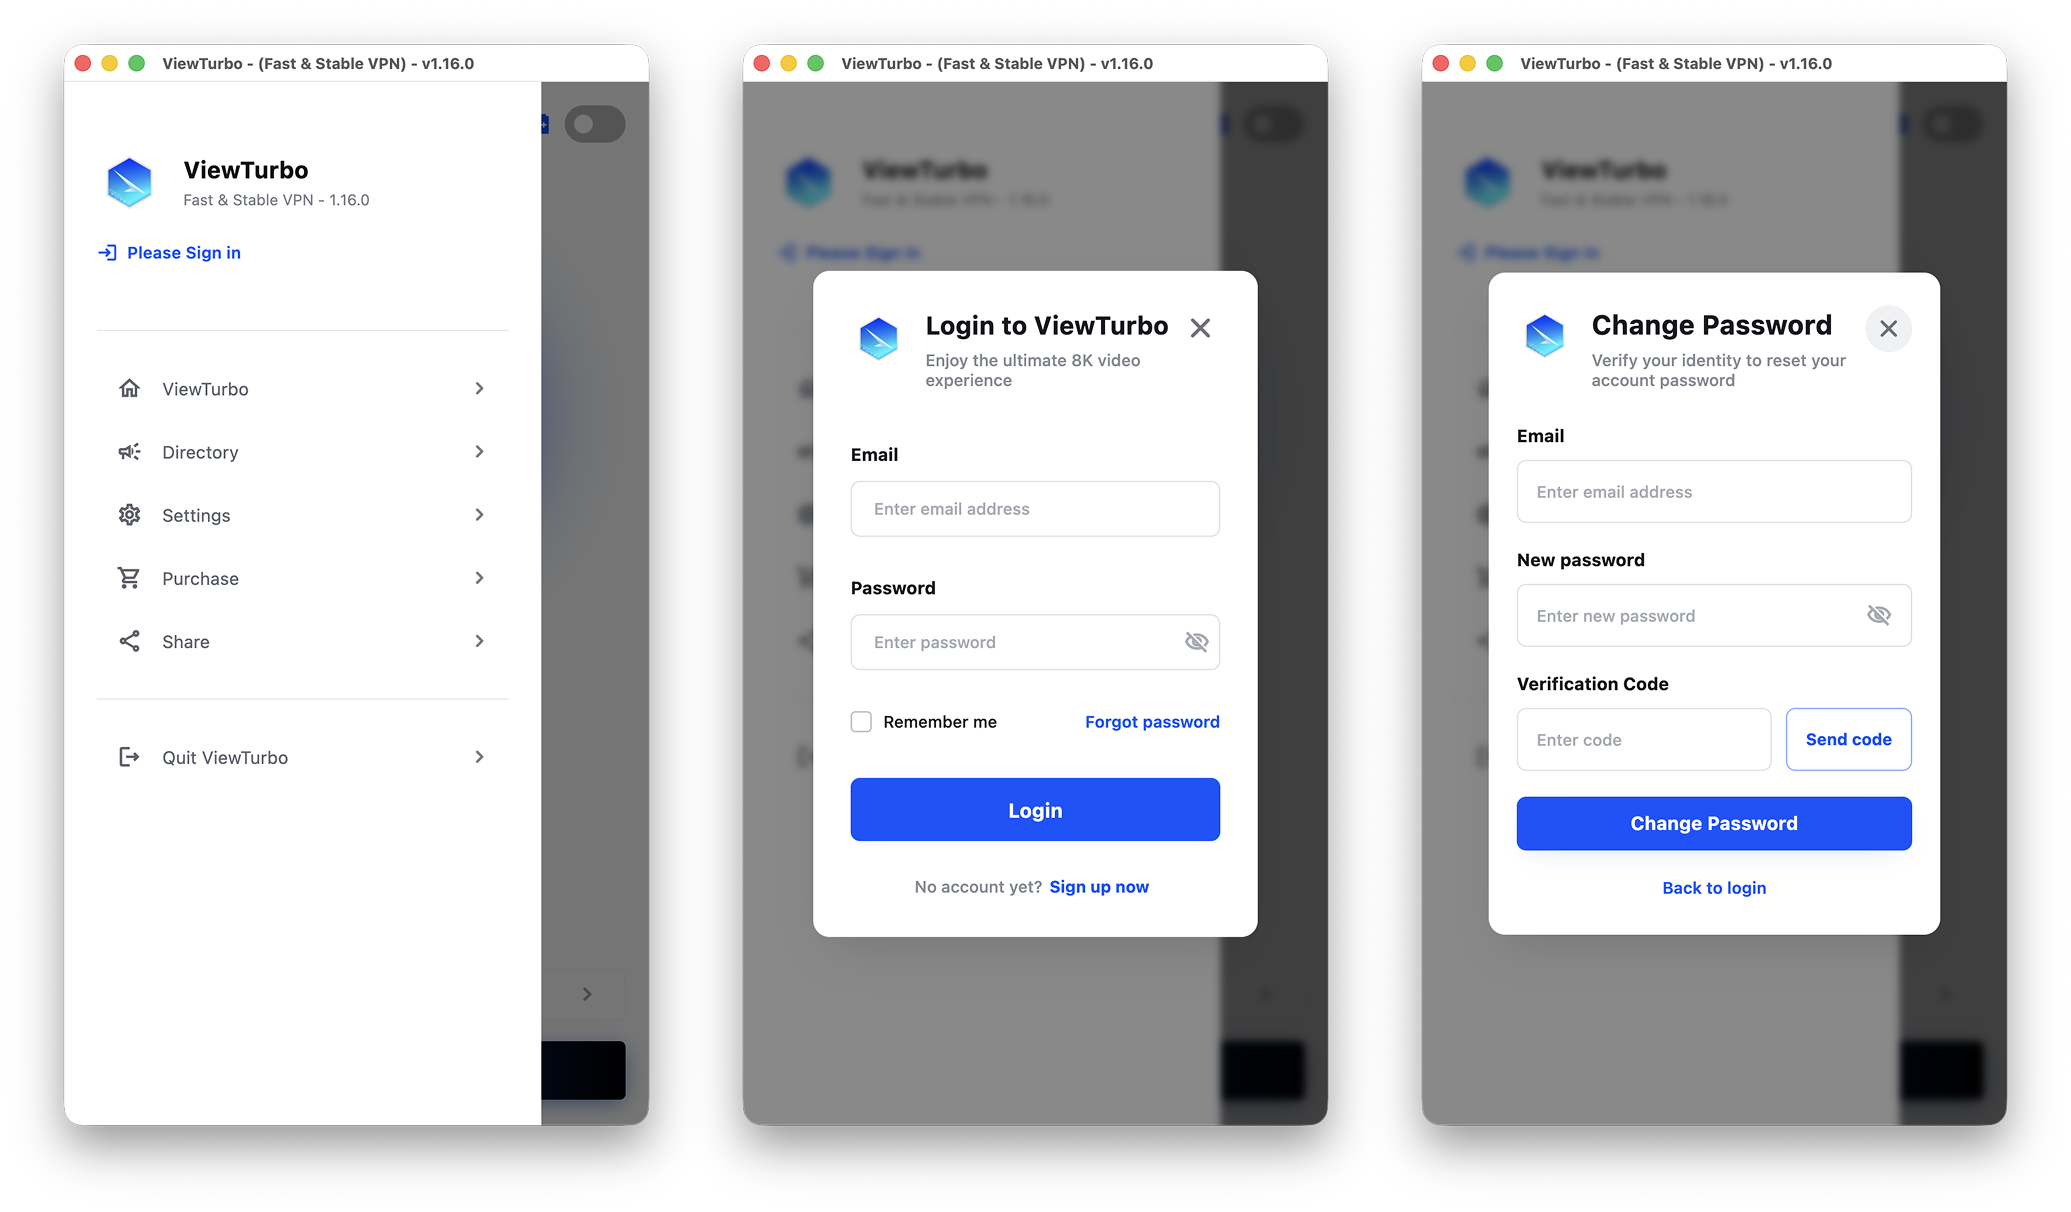
If you do not have an account, click Sign up now to register.
If your email username contains a dot, for example:
[email protected], you need to change it to:
[email protected]. We will still send the verification message to[email protected]. After registration succeeds, you also need to remove the dot when logging in.
If the email address you entered is [email protected], go to Gmail and check for the verification code from an address ending in [email protected].
We provide 200-500M of traffic for you to try. You can run a speed test. We also have a video that explains how to perform a speed test:
03 Select and Connect to a Node
3.1 Select a Node
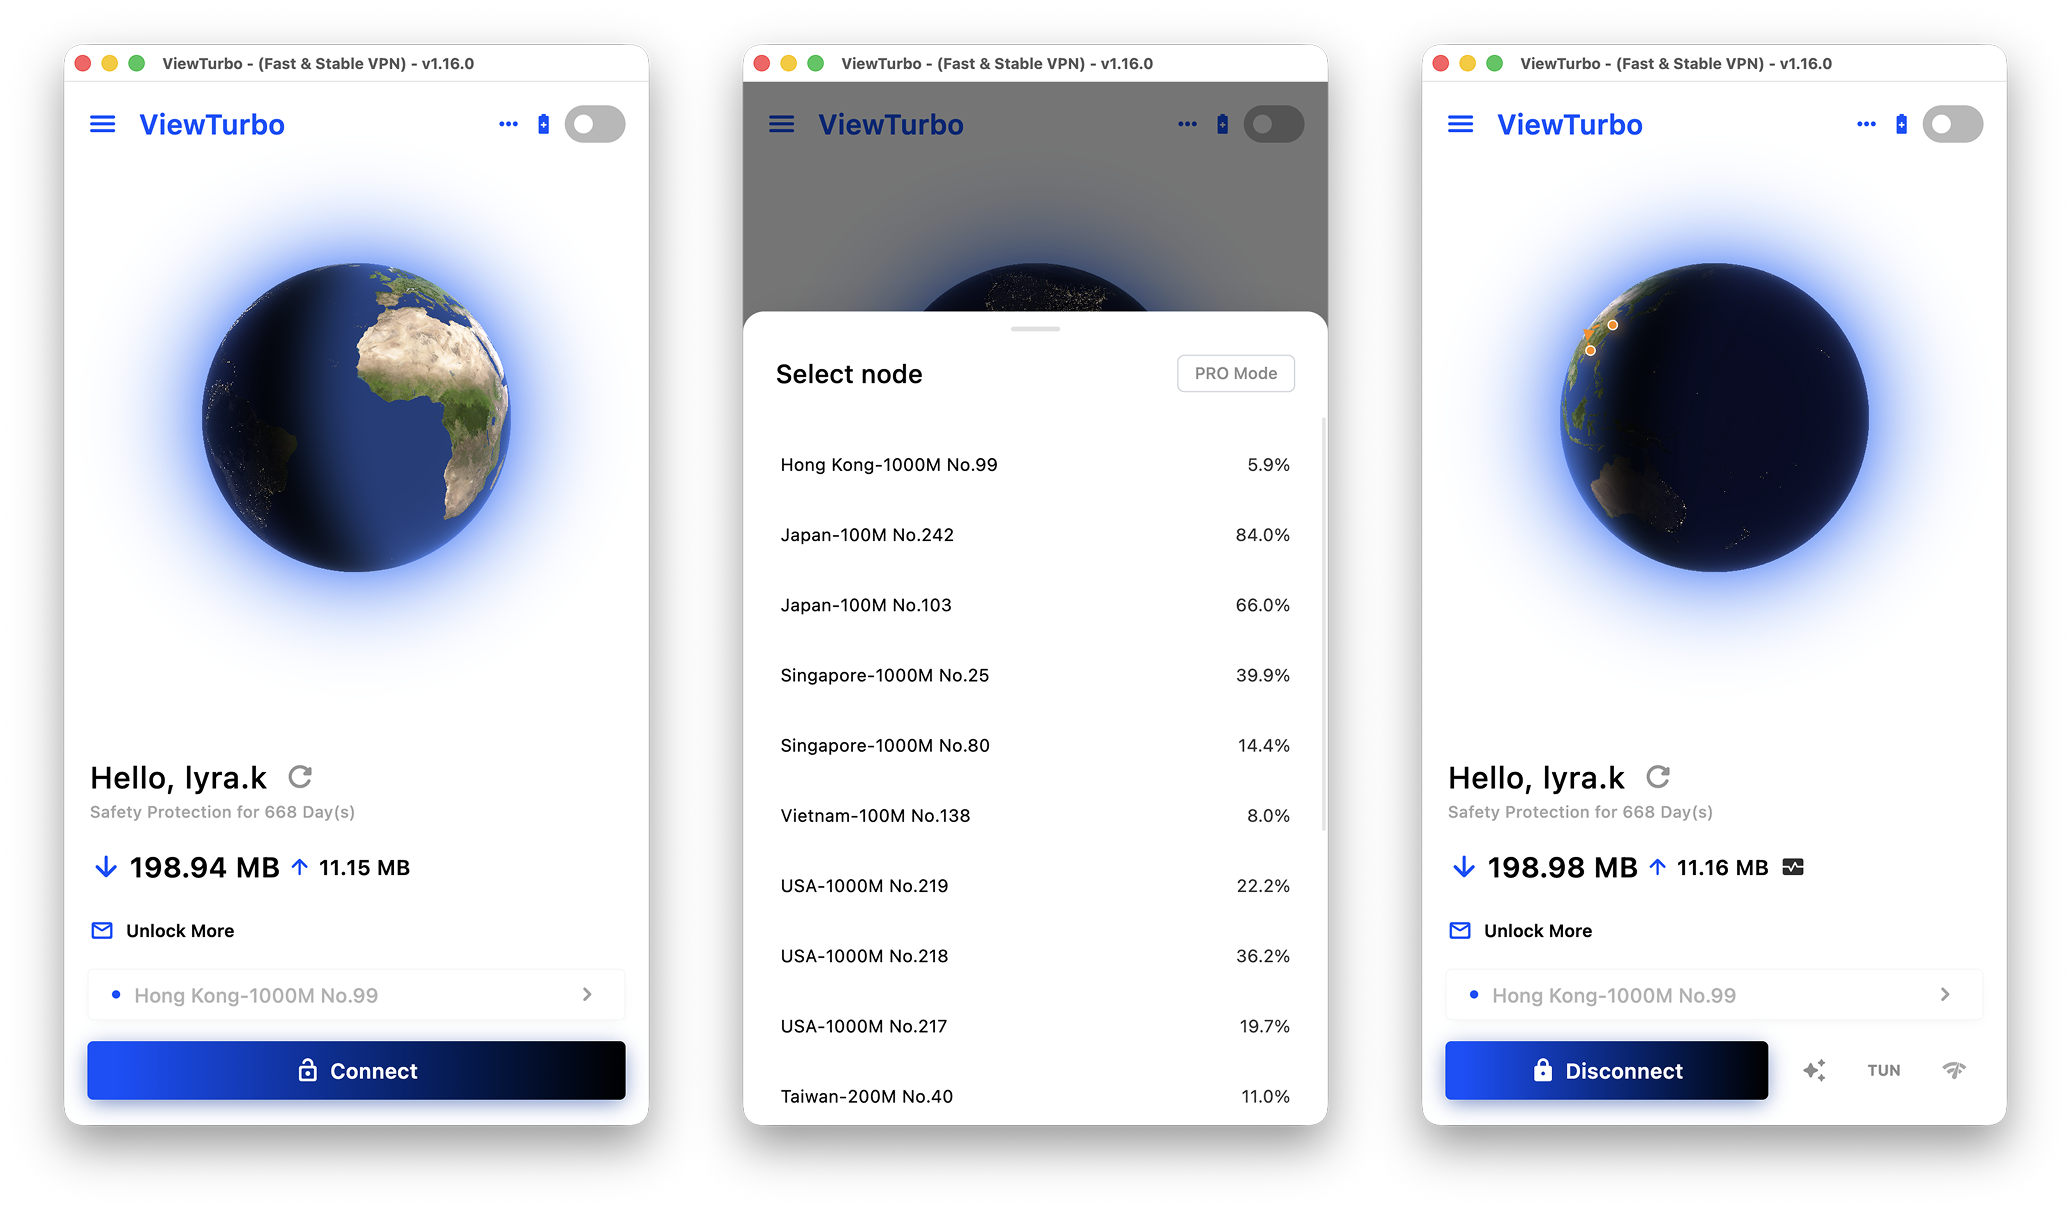
Before doing this, click in the upper-right corner to log in. Otherwise, the feature cannot be used.
Click  , which is the node name, to open the node selection screen.
After choosing a node, click Connect to connect to it.
You can scroll to the node you want, then click the node to select it.
In each node card, the node name on the left follows a relatively standard naming format: [NodeName]-[Mbps] [No.number]. Here is how to understand the less obvious parts:
- 5000M: 5000M means 5000Mbps, or 5Gbps, of bandwidth. 5000M (5Gbps) = 5000 megabits per second, which means the network supports a theoretical download speed of up to 625MB/s (5Gbps ÷ 8 = 625MB/s).
- The % on the right is
load, which indicates the network load on the server.
3.2 Features After Connecting

 Proxy mode switch defaults to smart proxy.
- AI Proxy: Smart proxy with automatic traffic routing. We recommend using this mode long term.
- Global Proxy: After enabling global proxy, automatic routing is disabled. All web requests are processed through the specified proxy server, so the user experience may be slightly reduced.
 TUN Mode
- The global tunnel mode has been unified to TUN mode. Compared with the previous implementation, TUN mode provides better system-level traffic interception, broader protocol compatibility, and improved connection stability, delivering a more reliable proxy experience in complex network environments.
 Network Test
- Used to test connectivity after connecting to a node and confirm whether the connection is working normally.
3.3 PRO Mode
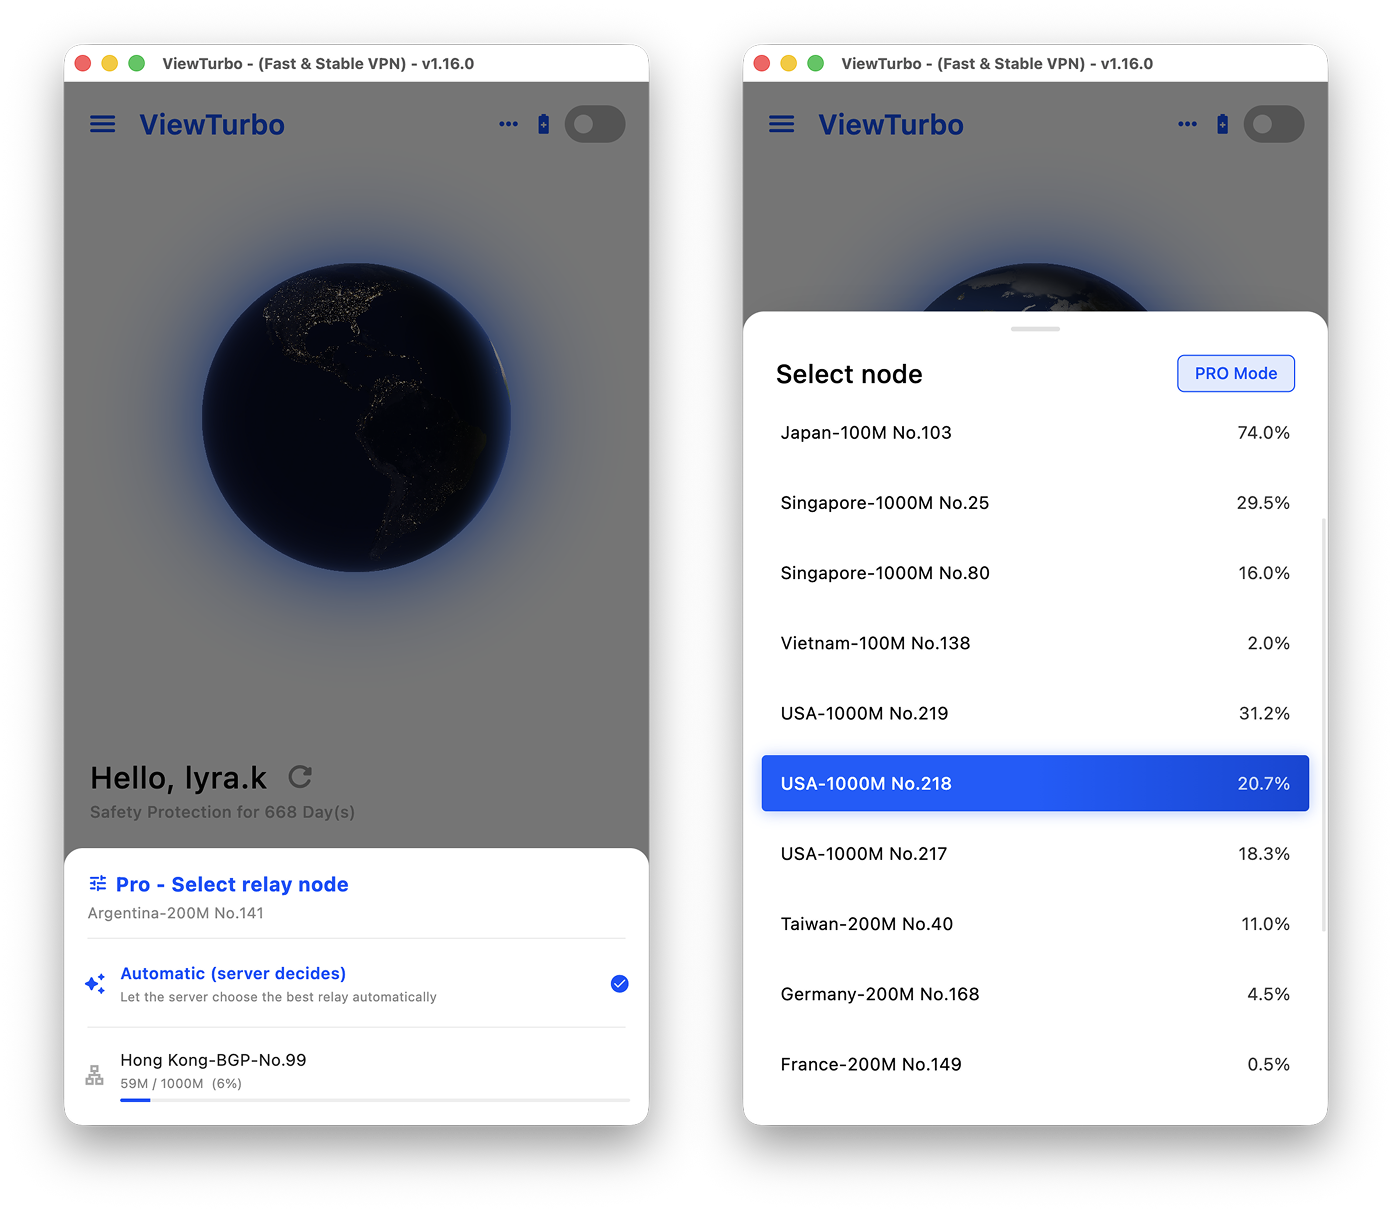
After enabling 「PRO Mode」
After selecting a proxy node, you also need to choose a relay node. The relay node acts as an upstream forwarding layer between your local network and the target proxy node, helping optimize the path from your ISP egress network to the proxy node.
With relay nodes, ViewTurbo can reduce the impact of ISP-side routing degradation, link interference, or connection blocking to a certain extent. This helps connections avoid unstable network paths and improves stability, availability, and the overall experience during cross-network access.
04 Device Management
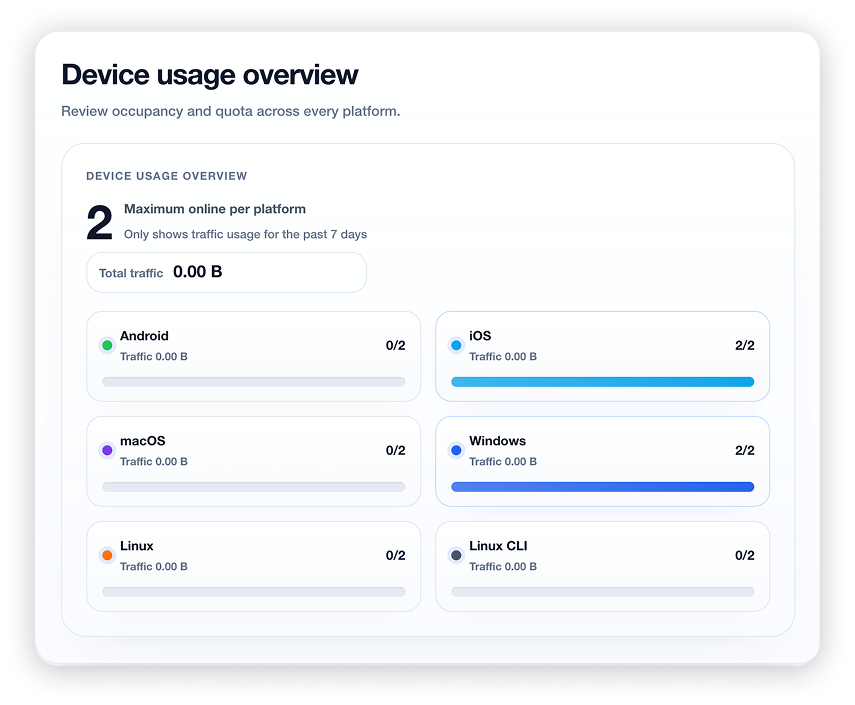
You can manage your devices at https://viewturbo.com/my.
Please note that our data usage statistics are not updated in real time and may be delayed by a few minutes or even several hours. These numbers are not perfectly precise and are only provided as a reference to help you understand your general data consumption.
Supports Ten Devices
Our proxy service allows up to ten devices to connect, including two Linux devices, two Windows devices, two Apple devices, two macOS devices, and two Android devices, providing flexible cross-platform compatibility.
Because multiple devices can be connected, effective device management is important. In the Devices tab on the main screen, you can view all previously connected devices. When you hover over a device, detailed information is shown.
Security
We implement device segmentation to isolate traffic between devices. This helps ensure that even if one device is compromised, an attacker cannot easily infiltrate other devices connected through ViewTurbo.
05 Other Features
5.1 Network Monitoring
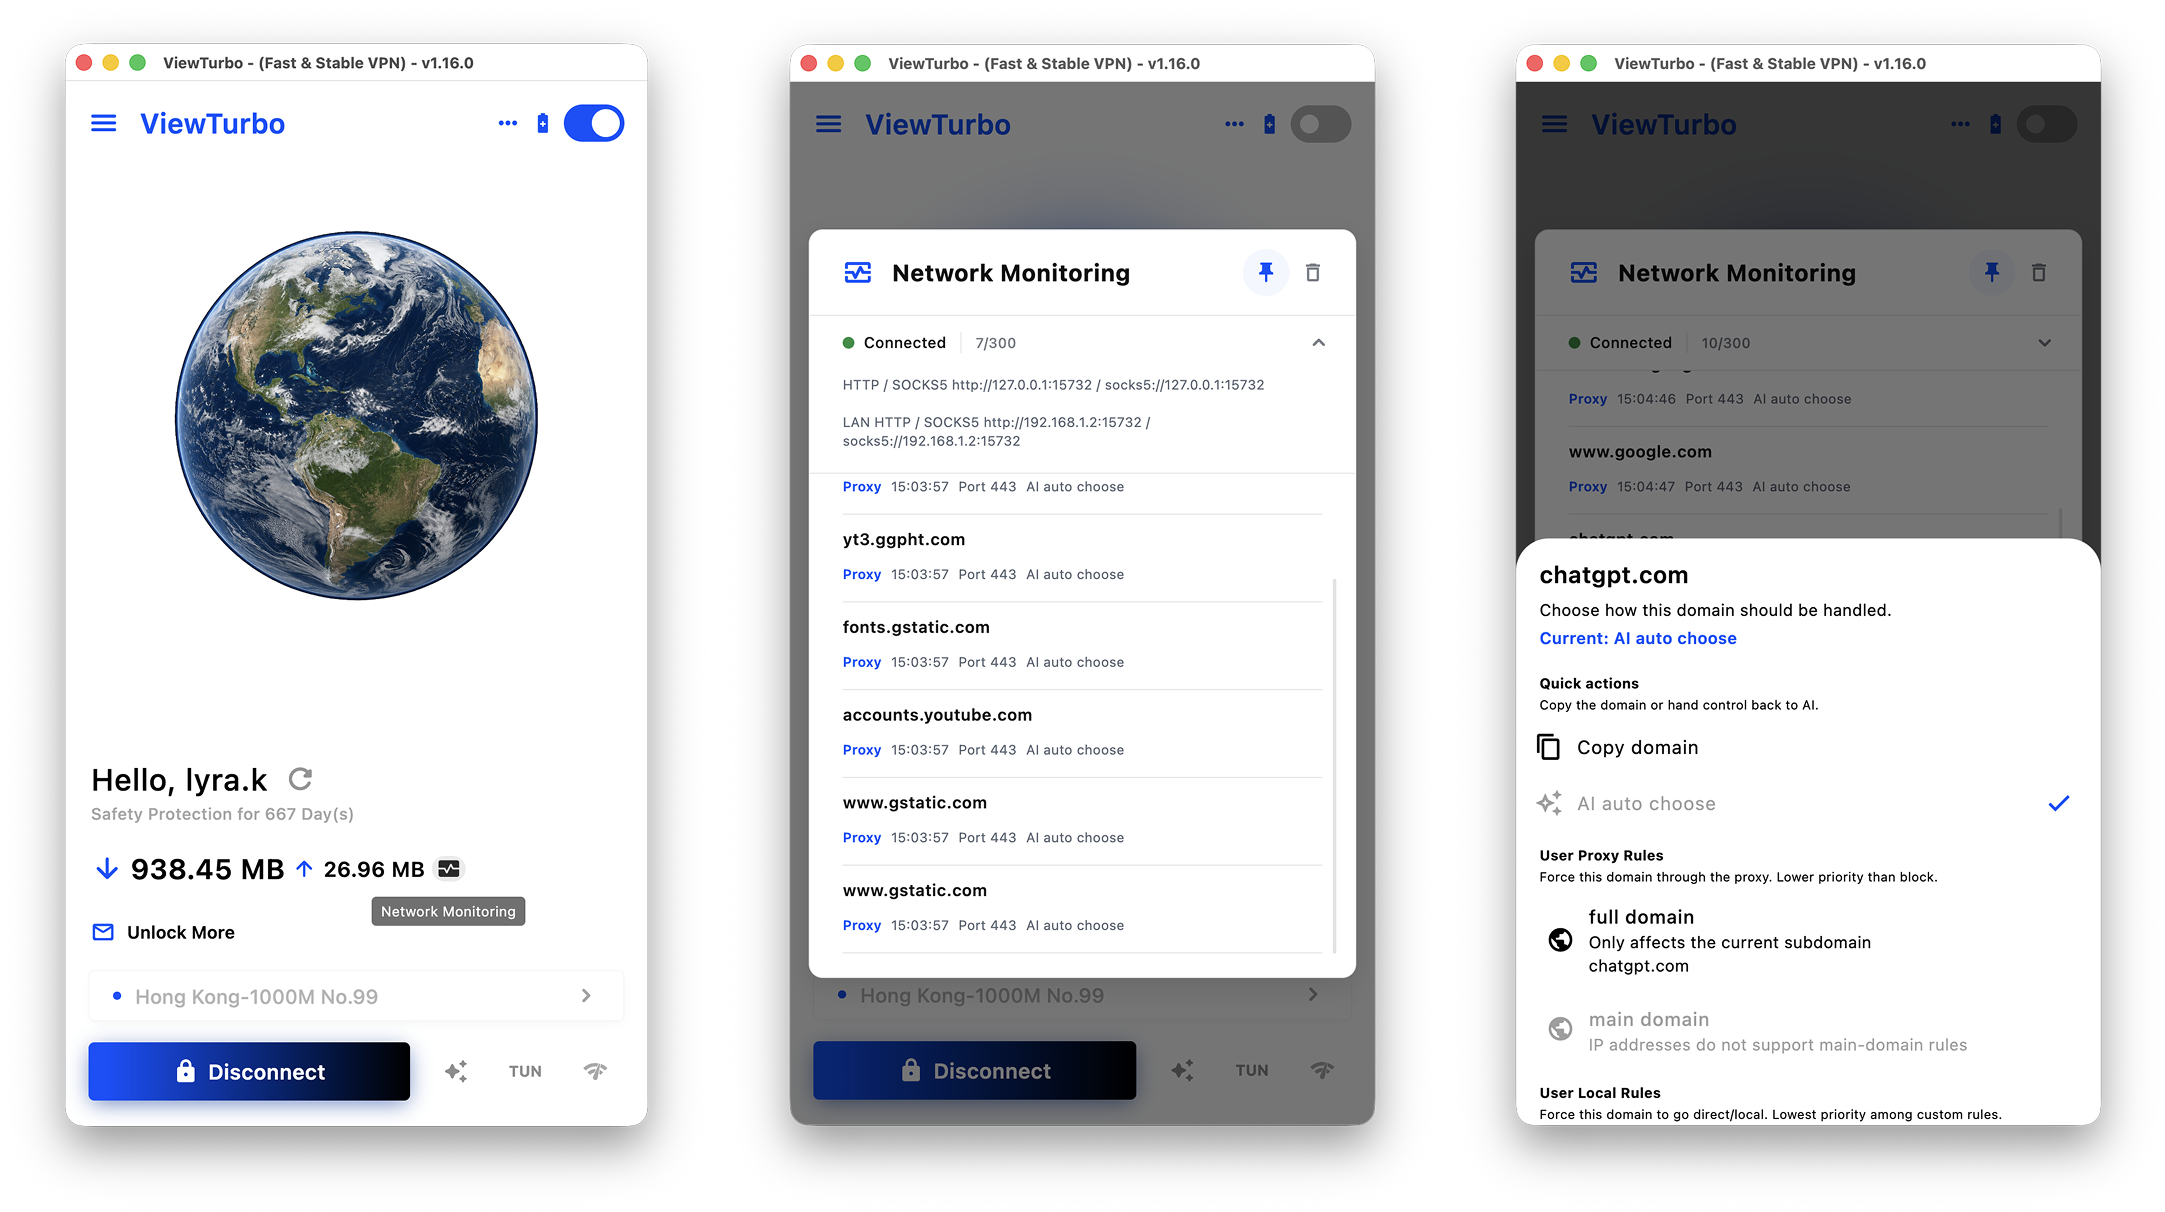
To access this feature, click  Network Monitoring on the main screen. After that, network traffic will appear there when you open a page or when the system automatically generates traffic.
What Are Auto, Proxy, Local, and Block?
- Auto: Decides whether to use a proxy based on the server response speed to the target address.
- Proxy: Accesses the target through a proxy.
- Local: Accesses the target directly through the local network without using a proxy.
- Block: Blocks that server from sending data to you.
Domain Scope Examples
- Main domain: For example,
youtube.com. - Subdomain: A name added before the main domain. For example,
www.youtube.com,m.youtube.com, andmusic.youtube.comare all subdomains ofyoutube.com. - All subdomains: All subdomains under the same main domain. For example,
*.youtube.comcan representwww.youtube.com,m.youtube.com,music.youtube.com, and more. When you choose main domain, it affects bothyoutube.comitself and these subdomains.
User Proxy Rules
Force this domain to be accessed through the proxy. Its priority is lower than block rules.
- full domain: When you enter a full domain, only that domain is affected. For example, entering
www.youtube.comonly affectswww.youtube.com, notyoutube.com,m.youtube.com, ormusic.youtube.com. - main domain: When you enter the main domain, the main domain itself and all of its subdomains are affected. For example, entering
youtube.comaffectsyoutube.com,www.youtube.com,m.youtube.com,music.youtube.com, and more.
User Local Rules
Force this domain to use direct/local network access. This has the lowest priority among custom rules.
- full domain: When you enter a full domain, only that domain is affected. For example, entering
www.youtube.comonly affectswww.youtube.com, notyoutube.com,m.youtube.com, ormusic.youtube.com. - main domain: When you enter the main domain, the main domain itself and all of its subdomains are affected. For example, entering
youtube.comaffectsyoutube.com,www.youtube.com,m.youtube.com,music.youtube.com, and more.
User Block Rules
Block this domain first. This has the highest priority among custom rules.
- full domain: When you enter a full domain, only that domain is affected. For example, entering
www.youtube.comonly affectswww.youtube.com, notyoutube.com,m.youtube.com, ormusic.youtube.com. - main domain: When you enter the main domain, the main domain itself and all of its subdomains are affected. For example, entering
youtube.comaffectsyoutube.com,www.youtube.com,m.youtube.com,music.youtube.com, and more.
These settings are saved in the files below. Click in the upper-left corner to open the navigation menu, click Setting to enter the settings page, then use Open Config Directory to view the configuration files.
A small hidden detail: some of our files support regular-expression domain matching.
- user_block.txt: Domains the user wants to block.
- user_local.txt: Domains the user wants to access locally.
- user_proxy.txt: Domains the user wants to access through the proxy.
- config.ini: Some ViewTurbo settings.
- Country.mmdb: A GeoIP database used to store geographic information for ViewTurbo automatic proxy routing.
- sys_local.txt and sys_proxy.txt: Stored in encrypted format and contain important system status and proxy server information.
- user_block.txt: Domains the user wants to block.
- user_local.txt: Domains the user wants to access locally.
- user_proxy.txt: Domains the user wants to access through the proxy.
5.2 Proxy Address
If you click Connected on the Network Monitoring page, it will show the HTTP proxy address and Socks5 address:
127.0.0.1:15732
Hover briefly to show detailed proxy addresses such as HTTP and Socks5:
127.0.0.1:15732 // HTTP
127.0.0.1:15732 // Socks5
5.3 Settings Page
Click in the upper-right corner of the home page to open the navigation menu. Then click to enter the Setting page.
What can this page do?
This page is the ViewTurbo settings center. In general, you can adjust the app language, choose your current region, and let the app automatically configure the system proxy and Git proxy. If you want finer control over which websites use the proxy, use the local network, or are blocked, you can also configure custom domain rules here.
- Language: Switch the app interface language, such as English or Chinese.
- Location: Choose your actual current country or region to help ViewTurbo provide a better connection experience. If your region is not listed, choose Others.
- Automatically set up the system proxy: Automatically configures the system proxy. After it is enabled, ViewTurbo configures the system network proxy for you, so browsers and most apps do not need proxy addresses entered manually.
- Automatically set up Git proxy: Automatically configures the Git proxy. After it is enabled, commands such as
git clone,git pull, andgit pushcan also connect through the ViewTurbo proxy. - User Local Rules: Manually specify domains that should use the local network without a proxy.
- User Proxy Rules: Manually specify domains that must use the proxy.
- User Block Rules: Manually specify domains to block, preventing them from continuing to send or receive data.
- Open Config Directory: Opens the configuration folder. Your custom rules and some app settings are stored here, which is useful for users who need to back up, inspect, or manually edit configuration files.
If the same domain appears in multiple custom rules, the block rule is applied first, then the proxy rule, and finally the local rule. In other words: Block > Proxy > Local.
5.4 Top Navigation Bar
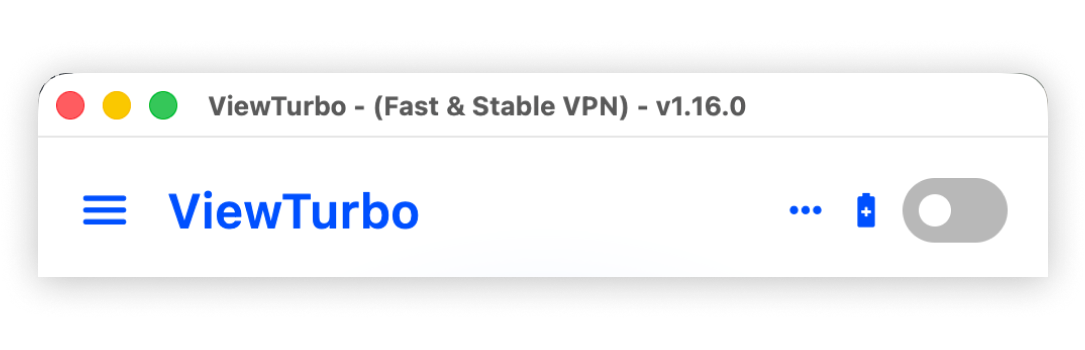
 opens the following features:
- Copy Proxy Variables
- Open Proxy Terminal
- Help
- Purchase
 Power saving mode. When enabled, the globe stops rotating.
6.3 Console Proxy
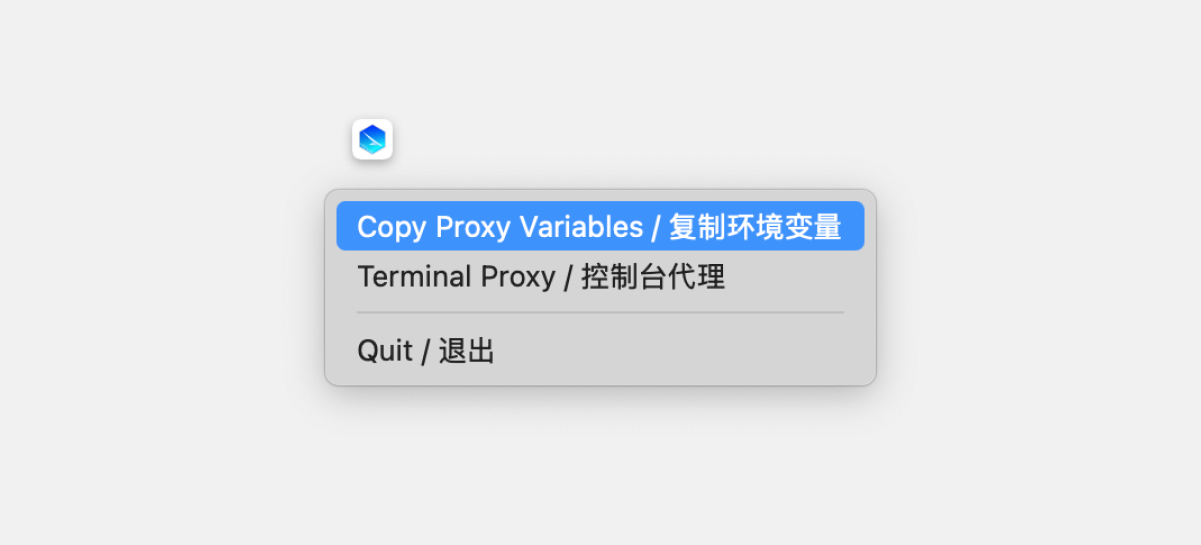
ViewTurbo provides a console proxy feature. If you only need it temporarily, click the tray item "Terminal Proxy / Console Proxy" and press Enter. The proxy will not be enabled the next time you restart your computer or reopen the terminal.
You can also make the console proxy persistent as follows:
If VS Code is installed, you can edit the file by running this command in the terminal:
code ~/.zshrc
Run echo $SHELL in the terminal to check your shell type.
- If it is /bin/zsh, run
vim ~/.zshrcin the terminal, pressato enter edit mode, and add: - If it is /usr/bin/bash, run
vim ~/.bashrc. The steps are the same as above, except the file name changes to~/.bashrc.
export http_proxy="http://127.0.0.1:15732"
export https_proxy="http://127.0.0.1:15732"
Then press :wq to save, run source ~/.zshrc to refresh the configuration, and run echo $http_proxy:
http://127.0.0.1:15732
If the output is as shown above, the console proxy is active.